Data-driven Testing
akaAT Studio supports Data-driven testing with several methods that allow test scripts to read inputs from internal or external data files. Particularly, in akaAT test cases, UI Objects or their properties can be parameterized as place holders and receive values during execution.
User can design Data-driven test scripts in akaAT Studio using:
-
Web UI Object Parameterization
-
Mobile UI Object Parameterization
-
REST Object Parameterization
-
SOAP Object Parameterization
There are many ways of passing different sets of values through parameters in test scripts
-
Global Variable and parameterized global variables.
-
Test Case Variable
The inputs passed through test scripts can be read from an external file such as Excel, CSV, Internal file, and Database.
3.3.1. Test Case Variable
You can run Test Case Variables in akaAT Studio to parameterize your test case or call that test case with different inputs.
To create a new variable, you can follow the instructions below:
-
Step 1: Open Variable tab
-
Step 2: Click on [ + ] button of any variable type
Note
- Local: used directly in this test case
- Input: for external use like binding data in test suite
-
Step 3: Input variable name
-
Step 4: Input Variable value
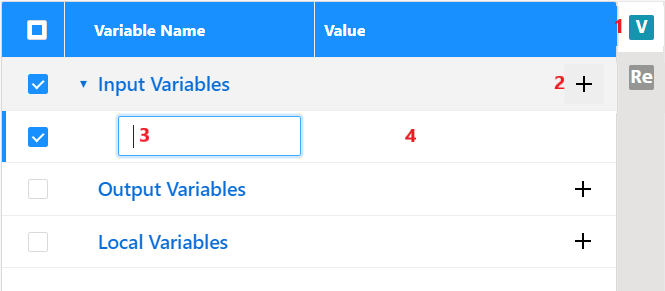
Note: Remember to save the test case once done.
3.3.2. Run test case with an external data source
akaAT Studio provides the ability to execute automation tests with external data sources.
- Step 1: Import an Excel file to Test Data
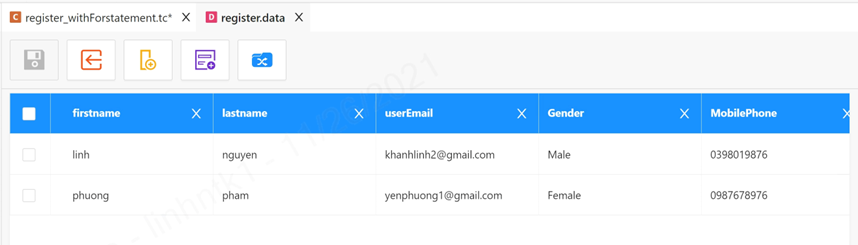
Refer to "Create an Excel Test Data" to learn how to import a Test Data Excel file in akaAT Studio. Data from the selected Excel file will be populated into the preview section like the below example:
In this example, we create Data of account to login website:
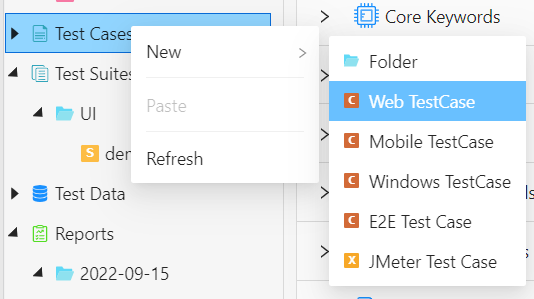
- Step 2: Create a test case with the variable called from the test data table by right click Test Cases > New > Select test case type -> Input test case name.
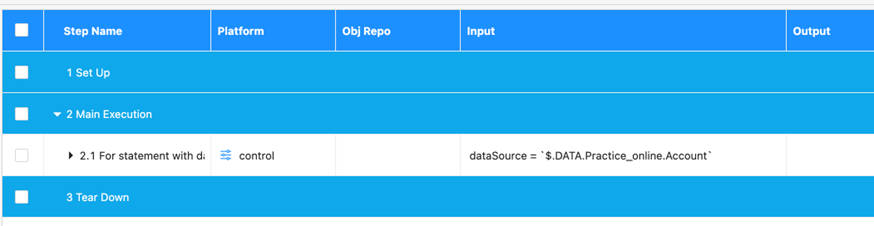
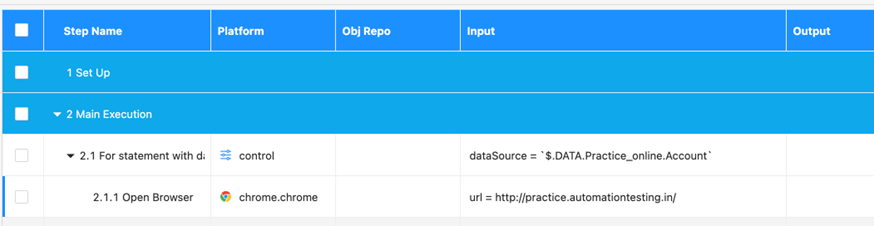
- Step 3: Using For loop to fill out the login form with a lot of accounts
- Search “For statement” step to add to the test case.
- Drag and drop “For statement” step to the test case.
- Double-click to the cell of Input, the Data Input popup will be displayed.
- Input data source by Syntax: $.DATA.DataFolderName.DataFileName
- Step 4
- Search the “Open Browser” step to add the test case.
- Drag and drop the “Open Browser” step to the test case.
- Double-click to the cell of Data Input, the Data Input popup will be displayed.
- Input URL to Value.
- Click OK.
- Step 5: Fill Username in the Username field.
- Search the “Send Keys” step to add the test case.
- Drag and drop the “Send Keys” step to the test case.
- Click to the cell of Object Repository, the UI Object popup will be displayed with a list of available locators.
- Click the Object Repository which you want to input text.
- Click OK.
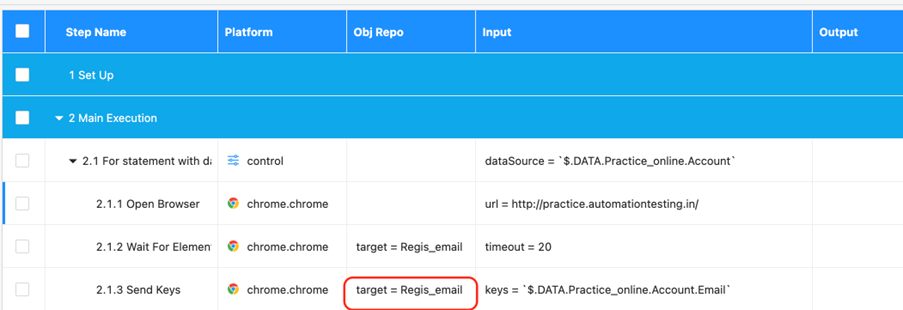
- Click the cell of Input, the Edit parameter popup will be displayed.
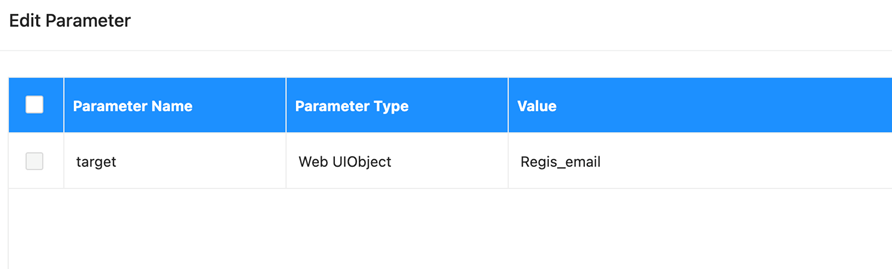
- Input data to Value with format $.DATA.DataFolderName.DataFileName.DataColumnName, i.e, we have $.DATA.DataExcel.Username.
- Click OK.

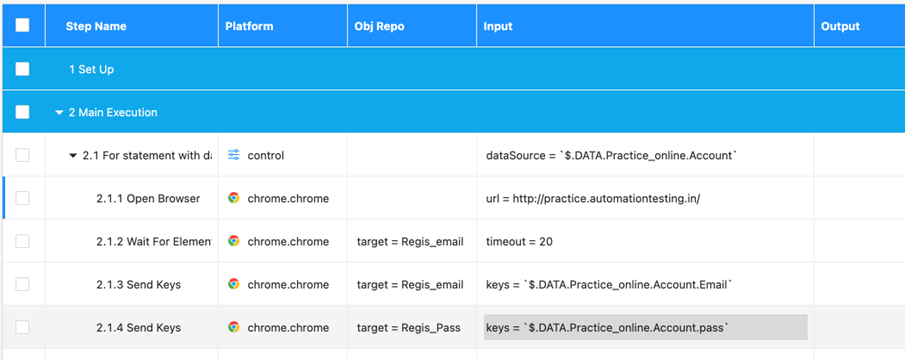
- Step 6: Use “Send Keys” keyword for the Password field. We have the following result.
- Step 7: Click to Login button
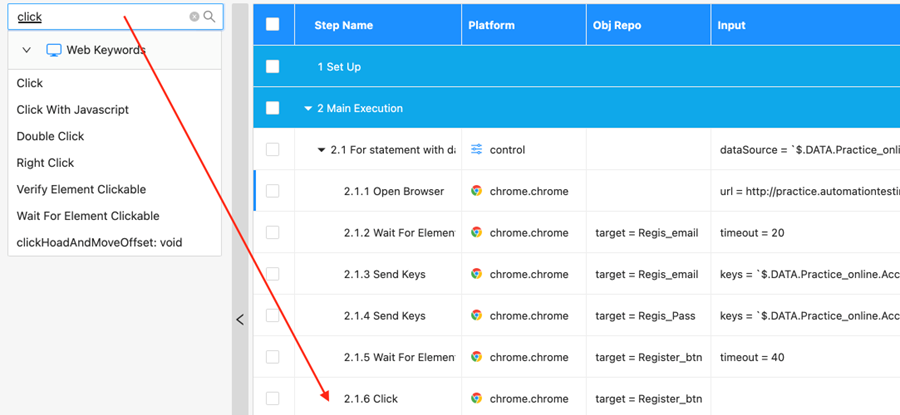
- Search “Click” step to add the test case.
- Drag and drop the “Click” step to the test case.
- Double-click the cell of Object Repository and choose the Object Repository which you want to input text.
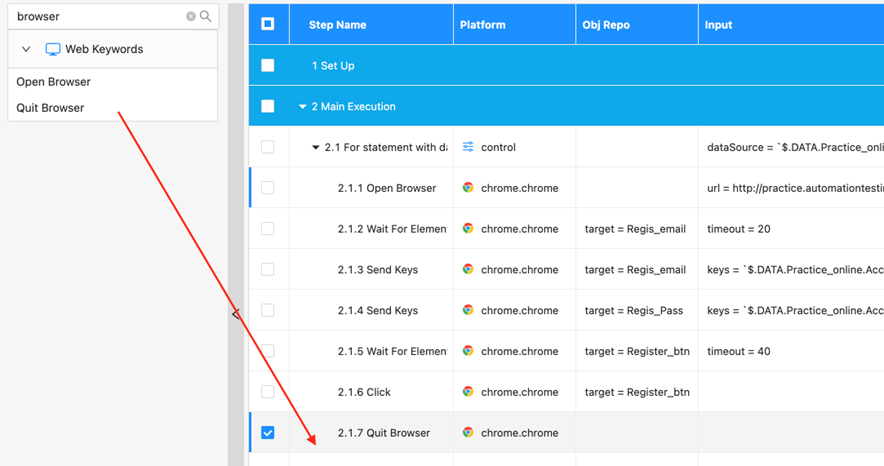
- Step 8: Close current browser.
- Search “Quit Browser” step to add the test case.
- Drag and drop “Quit Browser” step to the test case.
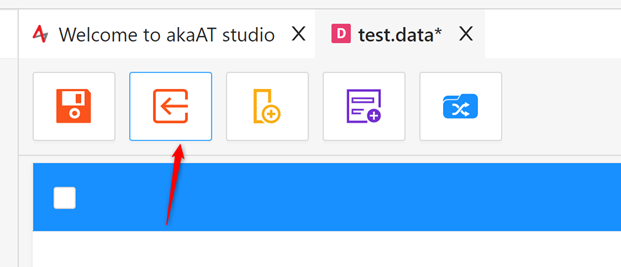
- Step 9: Click on
 to execute the test case.
3.3.3. Manage Test Data
3.3.3.1. Create Test Data by Importing from Excel
- Step 1: Browse to the Excel file that you want to import into akaAT Studio.
- Click on the [Import Data] icon.
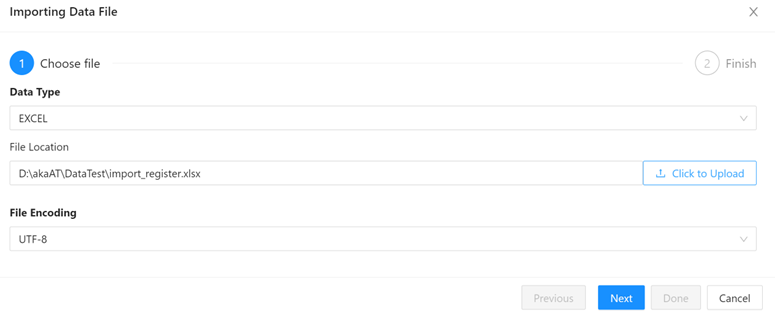
- Select “Excel” in Data Type.
- Select where your Excel file is located in File Location.
- Select one option in File Encoding.
- Click on [Next].
- Input SQL statement to Query.
- Click on Execute query.
- Click on Done.
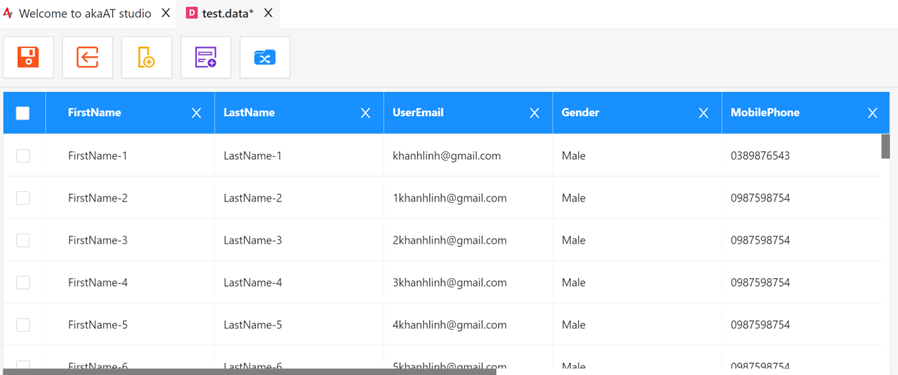
- Step 2: Data from the selected Excel file is populated into the preview section below.
- Step 3: Save the Test Data when you finish. The data set defined here can be utilized in other configurations.
3.3.3.2. Create Test Data by Importing from CSV
Do the same with "Excel Test Data"
- Step 1: Browse to the CSV file that you want to import into akaAT Studio
- Click on [Import Data] icon
- Select “CSV” in Data Type
- Select where your CSV file is located in File Location.
- Select one option in File Encoding.
- Click on [Next]
- Input SQL statement to Query
- Click on [Execute query]
- Click on [Done].
-
Step 2: Data from the selected CSV file is populated to the preview section below.
-
Step 3: Save the Test Data when you finish. The data set defined here can be utilized in other configurations.
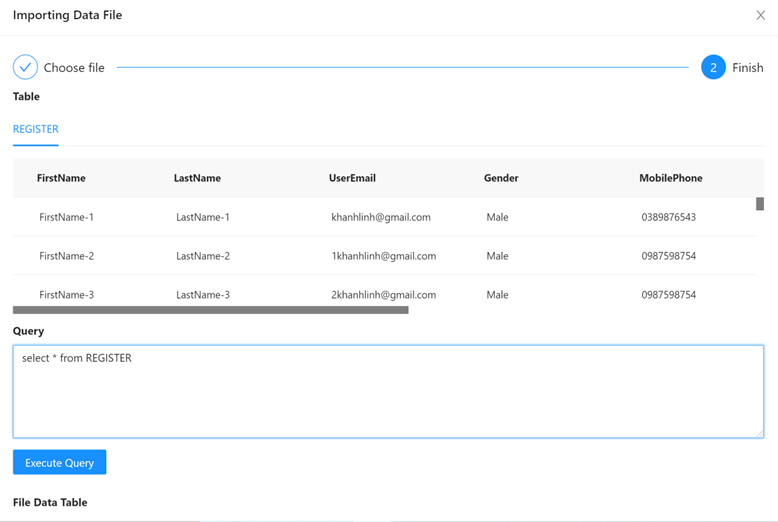
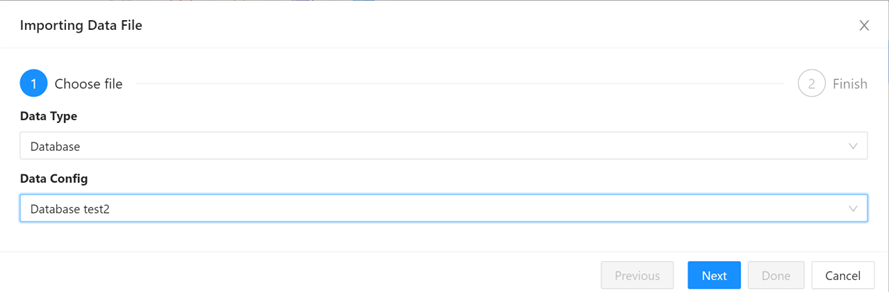
3.3.3.3. Create Test Data by Querying from Database
- Step 1: Browse to the Excel file that you want to import into akaAT Studio.
- Click on [Import Data] icon
- Select “Database” in Data Type
- Select Database Config
- Input to Connection String
- Click on [Next].
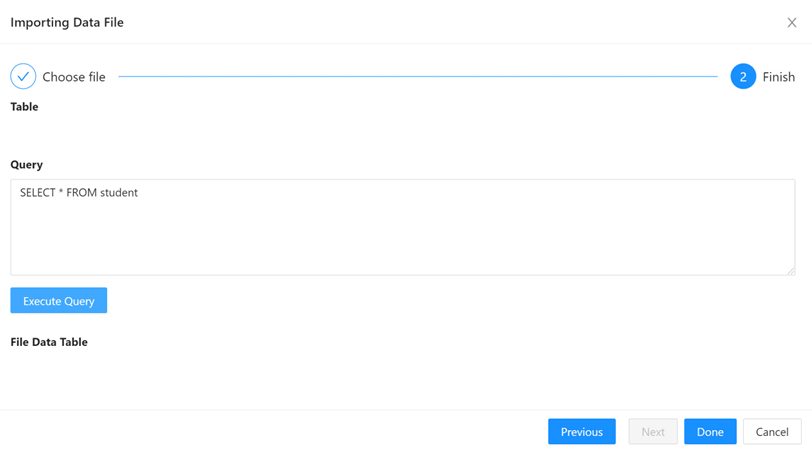
- Input SQL statement to Query
- Click on [Execute query]
- Click on [Done].
-
Step 2: Data from the selected Database is populated to the preview section.
-
Step 3: Save the Test Data when you finish. The data set defined here can be utilized in other configurations.
3.3.3.4. Create Internal Test Data
With Internal Data, you can freely define the data in tabular format. It's up to you to decide how many columns, rows, and what value for each cell.
- Step 1: In the Editor View, select the option to add a new column.
- Click on [Add column]
- Input name of column.
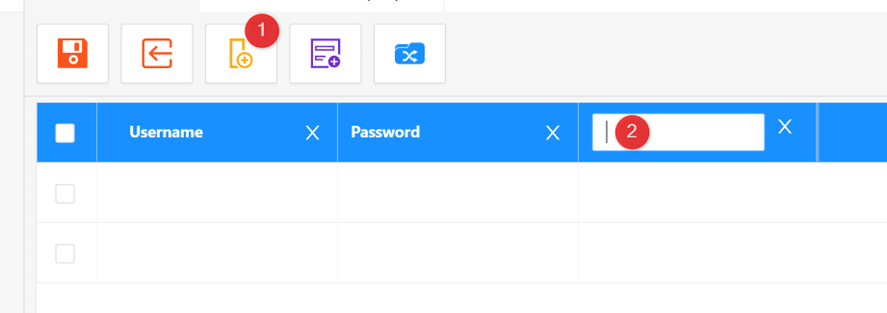
- Step 2: Select the option to add a new row.
- Click on [Add row]
- Input ID field.
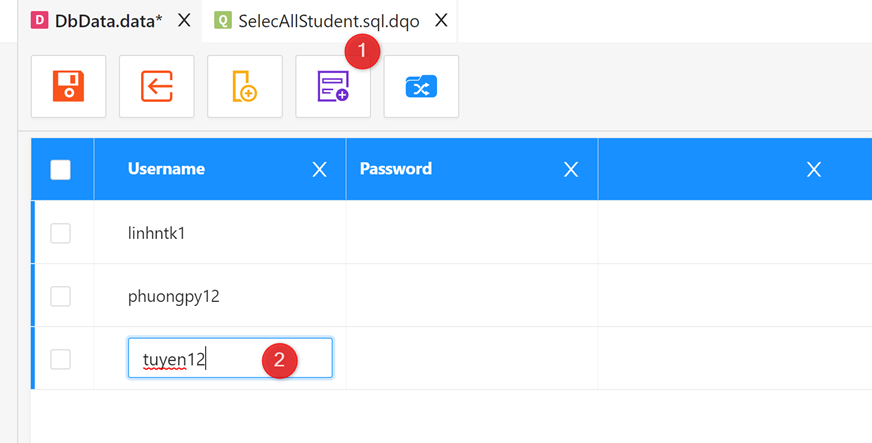
- Step 3: You can delete the rows by selecting them then press "Delete" on the keyboard.
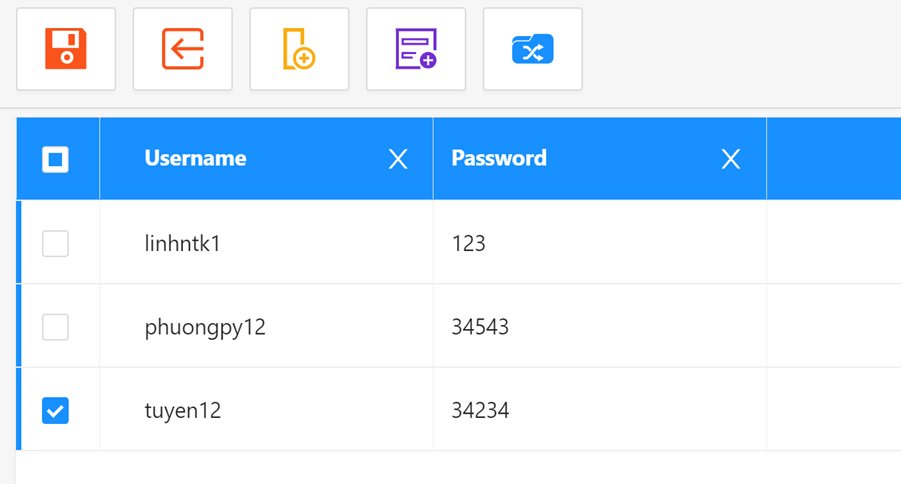
- Step 4: Save the Test Data when you finish. The data set defined here can be utilized in other configurations.